Nextjs Image with mdx-bundler

Spencer Miskoviak
August 17, 2022

Photo by Jessica Lee
A few months ago, I shared why and how I rebuilt this blog. Two of the core technologies used were Nextjs and mdx-bundler. These worked great for what I needed, except for one challenge. All blog post images (except for the cover images) were being bundled as inline data URLs within each page itself.
This caused some blog posts with either large images, or many images to be several megabytes, which negatively impacted the performance of these pages. I tried a number of solutions in the past without success, before landing on the approach shared in this blog post.
Why inlining images can be problematic
As with anything complex, inlining images directly into a JavaScript bundle has tradeoffs and therefore the right answer depends on the circumstances.
Inlining images has the benefit of avoiding an additional network request to fetch the image. The downside is that by inlining these images they can no longer be cached individually from the rest of the page content. Additionally, it can increase JavaScript load and parse times, and consume more resources.
Based on these tradeoffs, it's generally preferable to inline a few, small images (a few kilobytes) to cut down on the request overhead. They're still small enough to avoid a big performance hit in terms of caching or JavaScript execution. On the other hand, inlining many images, or large images can lead to issues.
Unfortunately I was doing both, inlining many images and large images. I knew this was an issue, but fixing this was not straightforward.
Problem
The challenge is the Nextjs Image component needs the images to be available at build time, and the dimensions need to be statically defined. Meanwhile, mdx-bundler itself runs at build time so the static images don't exist until after the build. Additionally, there is no straightforward way to define the required width and height properties in MDX, and even if possible it would be tedious.
Simple solution
This simple solution solves the core issue of using the Nextjs Image component, but has some tradeoffs to consider.
The first step is to pass the Image component to mdx-bundler so it's globally available in all MDX files.
import Image from "next/legacy/image";

// Pass the custom component mapping to the `mdx-bundler` component
// returned from `getMDXComponent`.
<Component components={{ Image }} />;
Then, in the MDX files you can use the Image component and pass the standard props.
<Image
  layout="responsive"
  height={300}
  width={600}
  alt="Example description"
  src="/posts/blog-post-slug/images/example.png"
/>
The benefit of this approach is that it's simple and fast. The downside is that this doesn't handle standard markdown image syntax and the dimensions need to be manually defined.
Solution
I spent a good amount of time reading documentation, searching, reading source code, and experimenting with different approaches to fix this issue, but didn't make any progress.
Recently, I came across a blog post about using the Nextjs Image component with next-mdx-remote and realized the solution could be adapted to also work with mdx-bundler.
The solution required the following steps:
- Move images to static
publicdirectory - Update MDX image paths
- Map
imgelement toImagecomponent - Dynamically set
widthandheightproperties withmdx-bundler
Move images to static public directory
Previously, all the images were alongside the MDX files. This worked well because it kept the images co-located with the blog post content which made it easy to move around and restructure. Additionally, it was trivial to inline these images with mdx-bundler through esbuild.
const { code, frontmatter } = await bundleMDX({
  // Other configuration...
  esbuildOptions(options) {
    options.loader = {
      ...options.loader,
      ".png": "dataurl",
      ".gif": "dataurl",
      ".jpg": "dataurl",
      ".jpeg": "dataurl",
      ".svg": "dataurl",
    };

    return options;
  },
});
This code configured esbuild to inline all these images into the build output as data URLs. As described above, this is fine for a few, small images but doesn't scale well. Unfortunately some blog posts needed many images, and many images were large. This caused the built output to balloon and negatively affect performance.
The first step was to move these images to the public directory so they could be treated as static images and loaded with the Image component. This can be done manually, but I opted to create a script to minimize errors.
// scripts/move-files.ts

import fs from "fs";
import path from "path";

const perform = () => {
  // Find all the posts within the project's `src/posts` directory.
  // Each post is its own directory which contains an MDX file and images.
  const posts = fs.readdirSync(path.join(__dirname, "..", "src", "posts"));

  // Process each post's images individually.
  posts.forEach((post) => {
    // The existing path for the images for this post.
    const oldImagePath = path.join(
      __dirname,
      "..",
      "src",
      "posts",
      post,
      "images"
    );

    // The desired path for the images for this post.
    const newImagePath = path.join(
      __dirname,
      "..",
      "public",
      "posts",
      post,
      "images"
    );

    // Not every post has images, so check if this one does before moving.
    if (fs.existsSync(oldImagePath)) {
      console.log(`Moving ${post} images...`);

      // Create any missing directories.
      if (!fs.existsSync(newImagePath)) {
        fs.mkdirSync(newImagePath, { recursive: true });
      }

      // Move the existing images to the desired location.
      fs.renameSync(oldImagePath, newImagePath);
    } else {
      console.log(`Skipping ${post} images, none exist.`);

      // Create a placeholder images directory so it exists for future use.
      // The `.gitkeep` file is created in the "empty" directory so
      // it can be checked in to git.
      const placeholder = path.join(newImagePath, ".gitkeep");
      if (!fs.existsSync(placeholder)) {
        fs.mkdirSync(newImagePath, { recursive: true });
        fs.writeFileSync(placeholder, "");
      }
    }
  });
};

perform();
This script is specific to the structure of my blog. However, it should be reusable with minor modifications to the paths. It can then be executed to move the images from each individual post directory to the public directory.
npx ts-node ./scripts/move-files.tsThe images are now in the correct location. However, all of the MDX is still referencing these images in their previous location.
Update MDX image paths
The next step was to update all of the MDX image paths to reference the new image location.
Previously, all the images were imported with relative paths since they were alongside the MDX. With this change, they now need to be an absolute path that points to this post's images in the public directory.
Below is an example of the necessary change.
-
+
Fortunately, this is a straightforward, mechanical change so the script can be modified to again avoid errors like typos or missing an image.
// scripts/move-files.ts
// ...
const perform = () => {
// ...
posts.forEach((post) => {
// ....
if (fs.existsSync(oldImagePath)) {
// ...
// Read the MDX source file contents.
const file = path.join(__dirname, "..", "src", "posts", post, "index.md");
const content = fs.readFileSync(file).toString();
// Find images in the MDX and update their paths.
//
// This uses three regex capture groups:
// - opening: (!\[.*\]\() = " = "./images/example.png"
// - closing: (\)) = ")"
const IMAGE_REGEX = /^(!\[.*\]\()(.*)(\))$/gm;
const updatedContent = content.replace(
IMAGE_REGEX,
(_match, opening, path, closing) => {
// The path is rewritten to load images from the public directory.
const updatePath = path.replace("./", `/posts/${post}/`);
// The opening & closing groups are passed through untouched.
return `${opening}${updatePath}${closing}`;
}
);
// Write the updates back to the original file.
fs.writeFileSync(file, updatedContent);
}
// ...
});
};
// ...
Note: if you ran the script above and moved the images, you will need to revert those image changes so this script works as expected.
Now running this script should both move the images to the static public directory and update the MDX image paths to properly reference their new location.
npx ts-node ./scripts/move-files.tsThe image file structure and MDX paths are now correct, but these images won't be loaded correctly.
Map img element to Image component
To load these images correctly, the images in the MDX need to be mapped to the Nextjs Image component.
This can be accomplished using component substitution, which allows mapping elements to custom components to control how the MDX is rendered.
In this case, the img element needs to be mapped to the Image component.
import Image from "next/legacy/image";

const COMPONENTS = {
  // Other element to component mappings...

  img: ({
    src,
    className,
    height,
    width,
    alt,
  }: React.ImgHTMLAttributes<HTMLImageElement>) => (
    <div className={className}>
      <Image
        layout="responsive"
        src={src}
        height={height}
        width={width}
        alt={alt}
      />
    </div>
  ),
};

// Pass the custom component mapping to the `mdx-bundler` component
// returned from `getMDXComponent`.
<Component components={COMPONENTS} />;
If you try this, it almost works, but an error is thrown.
Error: Image with src /posts/blog-post-slug/images/example.png must use width and height properties or layout=fill property.One small, but critical piece of information is still missing to make this work: each image's dimensions.
Dynamically set width and height properties with mdx-bundler
The Image component requires the width and height properties. This allows the image to render with the correct aspect ratio and avoid layout shift after the image loads.
The blog post mentioned earlier provided a unique solution to this problem. The images are static, so we can dynamically set the width and height while mdx-bundler is building the MDX using a rehype plugin.
To get started, two packages are needed to retrieve an image's dimensions and to traverse the abstract syntax tree in the plugin to find the image elements to modify.
yarn add image-size unist-util-visit
Now the plugin can be added. I won't cover the specifics of this code, as it's nearly identical to the plugin in the aforementioned blog post.
// src/image-metadata-plugin.ts

import imageSize from "image-size";
import path from "path";
import { Processor } from "unified";
import { Node } from "unist";
import { visit } from "unist-util-visit";
import { promisify } from "util";
import { VFile } from "vfile";

const sizeOf = promisify(imageSize);

interface ImageNode extends Node {
  type: "element";
  tagName: "img";
  properties: {
    src: string;
    height?: number;
    width?: number;
  };
}

function isImageNode(node: Node): node is ImageNode {
  const img = node as ImageNode;
  return (
    img.type === "element" &&
    img.tagName === "img" &&
    img.properties &&
    typeof img.properties.src === "string"
  );
}

function filterImageNode(node: ImageNode): boolean {
  return node.properties.src.startsWith("/");
}

async function addMetadata(node: ImageNode): Promise<void> {
  const res = await sizeOf(
    path.join(process.cwd(), "public", node.properties.src)
  );

  if (!res) throw Error(`Invalid image with src "${node.properties.src}"`);

  node.properties.width = res.width;
  node.properties.height = res.height;
}

export default function imageMetadata(this: Processor) {
  return async function transformer(tree: Node, file: VFile): Promise<Node> {
    const imgNodes: ImageNode[] = [];

    visit(tree, "element", (node) => {
      if (isImageNode(node) && filterImageNode(node)) {
        imgNodes.push(node);
      }
    });

    for (const node of imgNodes) {
      await addMetadata(node);
    }

    return tree;
  };
}
Finally, this plugin can be added to the mdx-bundler configuration. This plugin will traverse image elements, lookup their respective image in the public directory, and assign it's dimensions to the width and height properties which satisfies the Image component requirements.
// src/mdx.ts

import { bundleMDX } from "mdx-bundler";
import imageMetadata from "./image-metadata-plugin";

const { code, frontmatter } = await bundleMDX({
  // Other configuration...

  mdxOptions: (options) => {
    // Other configuration...

    // Configure the custom image metadata rehype plugin.
    options.rehypePlugins = [...(options.rehypePlugins ?? []), imageMetadata];

    return options;
  },
  esbuildOptions(options) {
    options.loader = {
      ...options.loader,
      // Still allow inlining SVGs since they are rare & small.
      ".svg": "dataurl",
    };

    return options;
  },
});
With this now configured, any static images included in MDX files built using mdx-bundler should now be loaded with the Nextjs Image component.
Conclusion
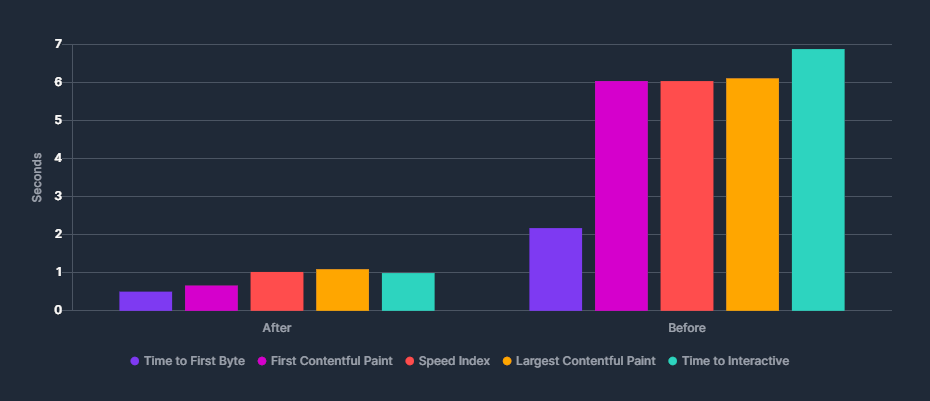
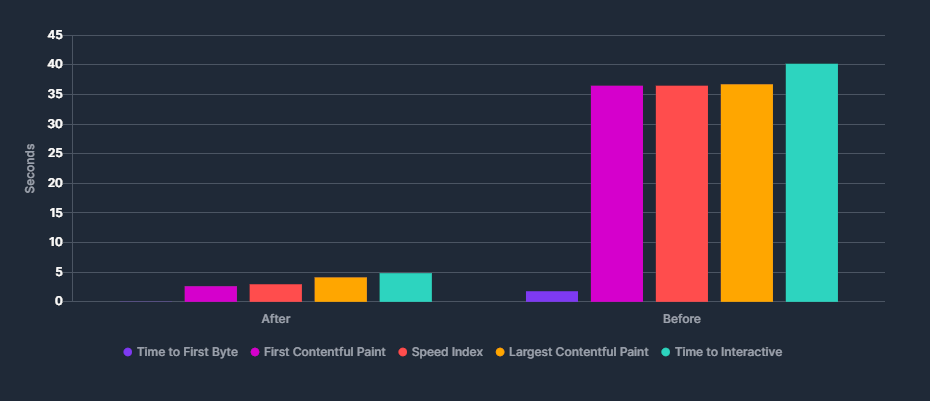
Overall, this dramatically decreased the size of each blog post and allowed Nextjs to further optimize the images which greatly improved the page performance.
I also made some other image related performance improvements by defining the sizes property, and more accurately using the priority property on only images near the top of pages.
All in all, these led to dramatic improvements based on the following lab data.
Hopefully a similar approach will work for you if trying to build a Nextjs MDX blog!
Tags:
course
Practical Abstract Syntax Trees
Learn the fundamentals of abstract syntax trees, what they are, how they work, and dive into several practical use cases of abstract syntax trees to maintain a JavaScript codebase.
Check out the course